Geometric Mosaic Polymer Clay Earrings Idea – Clay Jewelry
Blocks of colour set side by side, hard edges meeting with no blending across the seam. Mosaic earrings are built from a slab you make yourself, thin strips of clay pressed together and then cut through, so every pair comes out slightly different depending on where the cutter lands. Bold works better than subtle here. Red against yellow, blue against cream, stripes running at an angle. The shapes stay flat and large, which keeps them light on the ear.
Geometric Mosaic Polymer Clay Earrings

A mosaic veneer looks like painstaking work and mostly is not. You cut a grid across four colour sheets, lift the pieces, and drop them back down in the wrong order. The pattern comes from the mixing, not from any decision you make about each tile. What matters is the backing sheet underneath, because the hairline gaps between tiles read as grout lines and take the backing’s colour. Black backing gives you sharp mortar. Grey gives you a soft blur that flattens the whole design. This is a sellable earring in a matched pair, and the section below on batch consistency is where the money is.
Video By: My Vogue by Ama Creations
At a Glance
- Clay type: Polymer, oven-cured
- Brand: Sculpey Premo
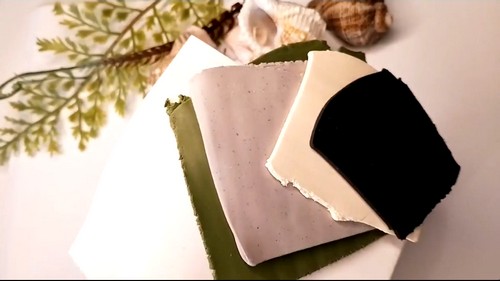
- Colours: Olive green, warm grey, off-white, speckled black, plus black for the backing
- Key tools: Pasta machine, tissue blade, 22 mm arch cutter, 30 x 18 mm rectangle cutter, 10 mm square cutter, pin vise
- Cure: 275°F / 130°C for 30 minutes
- Cool: 15 minutes before drilling
- Finished size: Dangle 30 to 32 mm, connector 10 mm, total drop 48 mm
- Weight: 1.5 g per earring
- Hands-on time: 1 hour 20 minutes, plus 30 minutes assembly the next day
- Total time: 26 hours including cure and epoxy set
- Difficulty: Confident beginner
Materials and Tools
Essential
- Sculpey Premo: Black, White, Zinc Yellow, Green, Burnt Umber
- Pasta machine
- Tissue blade, 100 mm
- Acrylic roller
- Metal ruler
- Arch cutter, 22 mm
- Rectangle cutter, 30 x 18 mm
- Square cutter, 10 mm
- Pin vise with 1.5 mm bit
- Two pairs of chain-nose pliers
- Jump rings, 5 mm, 20 gauge, stainless steel
- Flat-pad earring posts, 6 mm pad, surgical steel, with backs
- Two-part epoxy, 5-minute
- Ceramic tile
- Aluminium foil
- Oven thermometer
- 400, 600 and 800 grit wet-dry sandpaper
Nice to have
- Cutting mat with 5 mm grid
- Needle tool
- Scrap wood block for drilling
- Denim buffing scrap
- Kraft earring cards, 50 x 90 mm
- Cellophane bags, 70 x 100 mm
Colour Recipes
Ratios are by volume. Adjust by eye against the swatch you like.
Olive green: 6 Zinc Yellow, 3 Green, 1 Black. Warm grey: 12 White, 1 Black, 1 Burnt Umber. Off-white: 16 White, 1 Zinc Yellow. Speckled black: 8 Black conditioned smooth, then fold in 1 part crumbled cold White and pass through the machine once only. Backing: Black straight from the block.
Selling Them as a Pair
A mosaic sheet is never uniform. Cut both halves of every pair from adjacent areas of the sheet, not from opposite ends, and cut them in the same session. For pricing, count 40 minutes of your own time per pair once the sheet exists, and treat the sheet itself as a separate 30 minute cost spread across however many pairs it yields. A standard sheet gives eight pairs. Price the sheet time in once, not eight times.
The Build

Mosaic Veneer Sheet
- Condition each of the four tile colours and sheet them at 1.5 mm on the pasta machine.
- Sheet the black backing at 2 mm and cut it to 100 x 140 mm. Lay it on the tile.
- Lay one colour sheet flat and cut parallel lines at 8 mm intervals with the blade and ruler.
- Cut a second set of lines across the first at 60 degrees to make diamonds. Cut a third set at 8 mm across a corner of the sheet to yield triangles.
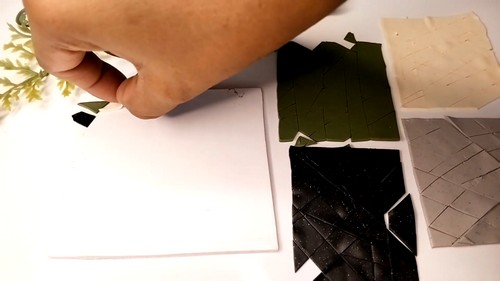
- Repeat the grid cutting on the remaining three colour sheets.
- Lift the pieces off in mixed handfuls and set them together in one tray.
- Place the pieces onto the black backing one at a time, leaving a 0.5 mm gap at every join, and rotate each piece so no two neighbours share an edge angle.
- Fill the full 100 x 140 mm area. Press each piece down as you set it.

- Roll the completed sheet once with the acrylic roller, working from the centre out, until the surface sits at 3 mm.
- Rest the sheet flat for 30 minutes.
Cutting the Components
- Cut arches from the mosaic sheet with the 22 mm cutter, pressing straight down and lifting straight up.
- Cut rectangles from the mosaic sheet with the 30 x 18 mm cutter, keeping 5 mm between cuts.
- Peel the waste web away from around the cutouts, starting at a corner and pulling at a low angle across the tile.
- Sheet the warm grey at 3 mm and cut the connector squares with the 10 mm cutter.
- Lift each piece onto a second tile with the blade, sliding the blade flat underneath rather than lifting by the edge.
- Sort into pairs and check that the two halves of each pair carry similar tile density.
Curing
Bake at 275°F / 130°C for 30 minutes. A flat 3 mm piece still gets the full 30, because Premo needs the time to fuse regardless of how thin it is. Sit the pieces directly on the ceramic tile with 10 mm between them, then tent the tile with aluminium foil so the foil does not touch the clay. Set the oven by an oven thermometer sitting inside it, not by the dial. Leave the tile in the oven with the door cracked for 15 minutes, then handle. Cold pieces drill cleanly. Warm ones grab the bit.
Finishing
Wet sand only the cut edges, not the mosaic face. Work 400, then 600, then 800 grit in a shallow bowl of water with a drop of dish soap, holding the piece flat and moving the paper rather than the piece. The face needs nothing, since the roller already burnished it and sanding across the tile joins opens them up.
Buff the sanded edges on denim until they match the face sheen. No sealer. Polymer takes a glaze badly at these seam lines, and any liquid finish wicks into the joins and darkens them unevenly.
Drilling and Assembly
- Rest each piece on the scrap wood block.
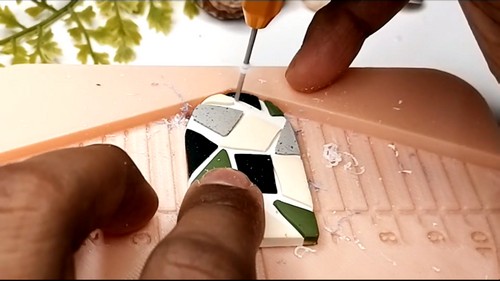
- Drill a 1.5 mm hole through the dangle 4 mm down from the top edge with the pin vise, twisting in one direction and easing off as the bit breaks through.
- Drill the connector squares 3 mm in from both the top and bottom edges.

- Scuff the back of each connector square with 400 grit in a 6 mm circle.
- Mix the epoxy and set a post pad centrally on each scuffed circle. Leave 24 hours before wearing.
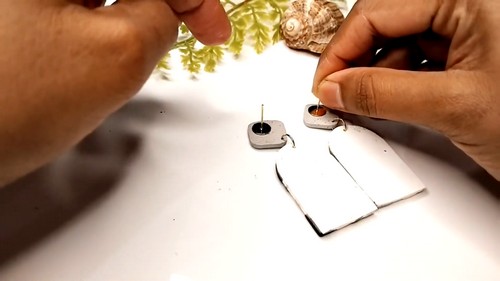
- Open jump rings by twisting one end toward you and the other away.
- Link each connector to its dangle and close the ring until the ends meet with no visible gap.
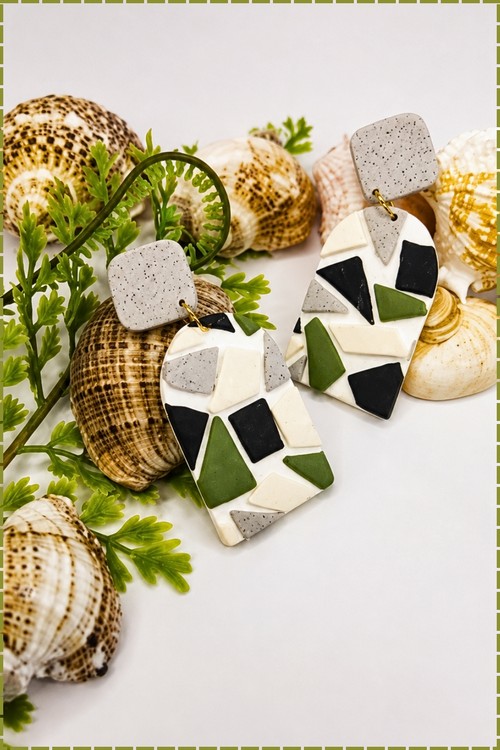
Surgical steel posts are the right call for anything sold, since plated base metal puts nickel into a fresh piercing. At 1.5 g per earring these hang without pulling.
Where Makers Go Wrong
Air gets trapped under a tile and shows up after the bake. A pocket you cannot see in raw clay expands in the oven and lifts a single tile into a blister, and there is no fixing it once cured. Press each piece down as you place it rather than relying on the final roll to seat everything.
Raw veneer sheets bleed in storage. Black pigment migrates sideways into off-white and grey tiles over two to three weeks, so a sheet you cut in March and bake in April comes out muddied at every join. Bake your cutouts within a few days, or bake the scrap sheet whole and use it for something else later.
Pattern density varies across the sheet and buyers notice. The area you filled first is always tighter than the area you filled last, so a pair split across that gradient looks like two different products under a shop light. Match pairs by eye before you cut, not after.
The hole wall thins from wear, not from drilling. A hole placed too close to the top edge holds fine on day one and cracks out through the top at week six, once the jump ring has flexed against it a few hundred times. Keep 4 mm of clay above the hole and check that measurement on every piece.
Variations
| Variation | What changes |
|---|---|
| Terrazzo scatter | Skip the grid. Chop the four colour sheets into irregular fragments with a blade, scatter them across the backing at 2 mm spacing, and let the black read as a field rather than as grout lines. |
| Single-colour relief | Cut all tiles from one colour at two thicknesses, 1 mm and 2.5 mm. Roll lightly so the height difference survives, and the pattern comes from shadow instead of hue. |
| Long bar drop | Replace the arch cutter with a 45 x 12 mm bar and drop the connector to a 6 mm square. Drill the bar 5 mm down, since a long piece levers harder on the hole. |
Packaging and Carding
Kraft cards at 50 x 90 mm suit this palette better than white, which fights the off-white tiles. Punch the post holes 20 mm apart and 25 mm down so the dangles hang clear of the card’s bottom edge rather than curling against it. Print your shop name in a single ink colour. Anything busier competes with the mosaic. Slide the carded pair into a cellophane bag, seal at the back, and store flat. Stacked cards press posts into the card below and bend them. For market tables, stand the cards in a slotted riser instead of laying them out, since these read almost flat from directly above.
Care
Perfume and hairspray soften bare polymer and leave a permanent tacky patch on the mosaic face. The tile joins collect skin oil, which darkens them over months, so wipe the face with a barely damp cloth every few wears. Do not store these with a jump ring hooked over anything, since the hole wall is the weak point. The epoxy behind the post is the first thing to fail, and it fails from heat, so keep them out of a hot car.
Quick Answers
Can I do this in air-dry clay? No. Air-dry tiles will not fuse to an air-dry backing the way polymer does, and the joins open into visible cracks as the sheet shrinks unevenly.
My blade is dragging colour from one tile into the next. The blade has picked up plasticiser. Wipe it on a baby wipe between every colour, and if smears are already on the sheet, lift the affected tiles and replace them rather than trying to scrape them clean.
Can I skip the backing sheet and just roll the tiles together? You can, but the tiles will slide apart under the roller and you lose the grout lines entirely. If you want the tiles edge to edge with no dark seam, roll at 2 mm and expect a 20 percent failure rate on the peel.