Polymer Clay Dangle Earrings With Green Mica Rice Beads
Polymer Clay Dangle Earrings

How to Make
Black polymer clay takes mica powder better than any other base. The powder sits on the surface and catches light against the dark clay underneath, so a plain rice bead reads like oxidised metal instead of painted plastic. These earrings use four of those beads, two a side, linked with pins into a drop that lands just below the jaw. They weigh under two grams each. That matters more than the finish does, because an earring you take off at lunch is an earring you stop wearing. Solid clay at this scale stays comfortable through a full day, and the shaping is done with a blade and a needle tool.
Designer Credit
Technique adapted from a video tutorial by Bhavani Jewellery.
At a Glance
- Clay: Black polymer clay, Sculpey Premo Black
- Colour finish: Green mica powder, Pearl Ex Interference Green
- Tools: Tissue blade, ruler, 1.5 mm needle tool, soft round brush, ceramic tile, wooden skewer, round-nose pliers, chain-nose pliers, flush cutters
- Cure method: Oven bake, 275°F / 130°C for 45 minutes
- Finished size: 30 mm drop excluding the hook, beads 13 mm long by 6 mm wide
- Hands-on time: 55 minutes
- Total time: 3 hours to wearable, 24 hours for the sealer to reach full hardness
- Difficulty: Easy
Styling and Wear
A 30 mm drop clears a shirt collar and stops short of the shoulder, which is the length that survives a scarf. The green shifts hard between light sources. Under daylight it runs cool and metallic, under a warm bulb it drops toward bronze, so these read differently at a desk than they do outside. Steel and gunmetal findings sit better against the powder than yellow gold, which fights the shift. At under two grams a side the lobe stays unstretched all day. The weak point is never the clay, it is the pin loop, so buy findings once and buy them decent.
Materials and Tools
Essential
- Black polymer clay, Sculpey Premo Black, one 57 g block
- Green mica powder, Pearl Ex Interference Green
- Head pins, 0.7 mm (21 gauge), 50 mm, surgical steel or nickel-free, 2
- Eye pins, 0.7 mm (21 gauge), 50 mm, surgical steel or nickel-free, 2
- Earring hooks, surgical steel or nickel-free, 1 pair
- Water-based polyurethane sealer in satin, such as Varathane
- Ceramic tile
- Tissue blade
- Steel ruler
- Needle tool, 1.5 mm
- Soft round brush, size 4
- Wooden skewer
- Foil and cardstock
- Oven thermometer
- Round-nose pliers, chain-nose pliers, flush cutters
- Baking tray
Nice to have
- Pasta machine
- Acrylic roller
- Bead roller
- Pin vice with a 1.5 mm bit
- Dust mask
- Isopropyl alcohol and lint-free cloth
The Build
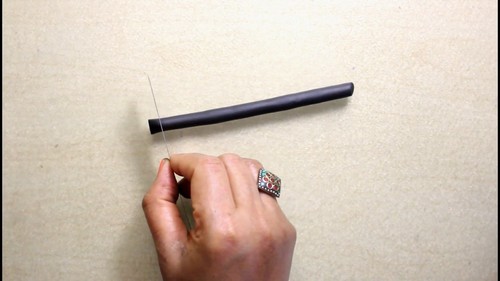
Conditioning and Cutting the Blanks
- Condition the black clay until a folded strip bends without cracking at the crease, about two minutes through a pasta machine on the thickest setting with a fold between each pass, or five minutes of hand kneading.
- Roll the conditioned clay into a log 8 mm in diameter and about 50 mm long on the ceramic tile, keeping the diameter even from end to end.
- Mark the log at 7 mm intervals against the ruler and cut six sections with the tissue blade, pressing straight down rather than dragging.
Shaping and Piercing the Beads
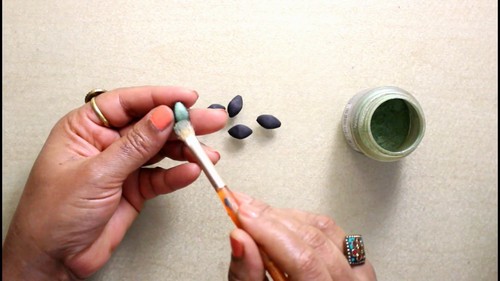
- Roll each section into a smooth ball between the palms until no cut edges or seams remain.
- Roll each ball under one finger with light pressure at the ends to draw it into a rice shape 13 mm long and 6 mm at the widest point, tapering both ends to a blunt tip.
- Pierce each bead lengthways with the needle tool, entering one tip and stopping at the midpoint, then entering from the opposite tip until the two channels meet.
- Roll the pierced bead lightly between two fingers to bring the exit tips back to a clean taper.

Applying the Mica
- Load the soft brush with green mica powder, tap the excess onto scrap paper, then work the powder over the full surface of each bead with short overlapping strokes, turning the bead on the needle tool as you go.
- Burnish each bead with one clean dry fingertip until the surface holds an even sheen with no loose powder.
Curing the Beads
Thread the four best beads onto the wooden skewer, spaced apart, and suspend the skewer across the rim of a foil-lined tray so no bead touches a surface. Beads baked lying down burnish a flat spot into the mica exactly where they meet the tray, and that mark does not lift out afterwards. Tent the whole tray loosely with a second sheet of foil. Set the oven to 275°F / 130°C, confirm it against an oven thermometer sitting on the tray, and bake for 45 minutes. The thickest point here is 6 mm, so 45 minutes runs comfortably past the Premo minimum and builds real strength at the pin channel. Leave the beads on the skewer until fully cool.
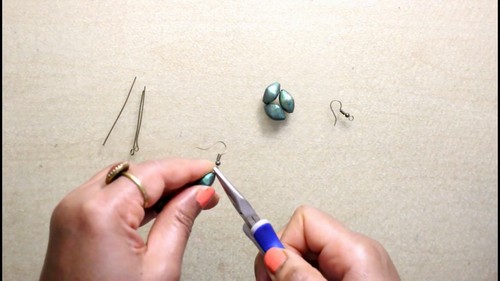
Finishing
Skip the sanding. Mica lives in the top fraction of a millimetre, and 800 grit takes it straight back to black. If a bead comes out with a fingerprint or a ragged hole rim, wet sand that spot alone at 800 then 1000 grit, re-dust it with powder, and rebake for 15 minutes at 275°F / 130°C. Do not buff raw mica with denim before it is sealed. Seal every bead with water-based polyurethane in satin, two thin coats a soft brush applied an hour apart, carrying the brush into the hole rims as well as the body. The beads handle safely after two hours and reach full hardness in 24.
Assembling the Earrings
Use 0.7 mm surgical steel or nickel-free findings throughout, one head pin and one eye pin per earring.
- Thread one bead onto a head pin and trim the wire to 8 mm above the bead with flush cutters.
- Bend the trimmed wire to 90 degrees where it leaves the bead, then roll a 3 mm loop with round-nose pliers and close it flush against the stem.
- Thread a second bead onto an eye pin, trim to 8 mm, and turn an identical 3 mm loop.
- Open the eye pin’s lower loop by twisting it sideways with chain-nose pliers, never by pulling the ends apart, hook the head pin loop into it, and twist it shut.
- Open the upper loop the same way, add the earring hook, and close it.

Both beads hang on one vertical line, so put the heavier of the two at the bottom and the drop stays plumb.
Where Makers Go Wrong
Mica wears off at the joints first. Sealer applied thinly at the tapered ends leaves the powder exposed exactly where the pin loop rubs, and after a few months of wear a green bead has two black collars. Nothing lifts that back out short of a re-dust and a rebake.
Loose powder lands on clay you have not baked yet. Green mica travels across a work surface invisibly, and a stray smear on raw black clay shows up only after the oven has fixed it in place. Wipe the tile with isopropyl alcohol between the shaping and the powdering, and do the powdering last.
Simple loops open on their own. A dangle swings all day, and an unwrapped loop works itself apart over months until the bottom bead leaves in a coat pocket. Wrapped loops cost five minutes a pair and end the problem outright.
The pair drifts at the loops, not the beads. Two loops turned a millimetre apart in diameter put a two-millimetre difference in the finished drop, which is invisible on the bench and obvious in a mirror. Turn all four loops against the same mark on the pliers.
Variations
| Variation | What changes |
|---|---|
| Graduated trio | Three beads a side at 15, 13 and 10 mm. The drop grows to 42 mm and the weight to roughly 2.5 g, so test one against your lobe before building the second. |
| Textured highlight | Press fine linen or lace into each bead before piercing, then skim the loaded brush across the raised surface only, leaving black in the recesses. |
| Threader version | One bead a side on a 60 mm threader chain instead of two on pins. Halves the weight and removes every loop from the design. |
Care
Take them off before hairspray and perfume, since solvent overspray dulls the sealed mica film. Store them hanging or in a soft pouch, not loose in a dish where beads knock together and abrade the coating. Do not sleep in them, because the pin loops bend at the joint and the drop then hangs crooked. Keep them out of a closed car in summer, as heat can soften water-based sealer back to tacky. When the green looks flat after a year of wear, re-coat the beads rather than polishing them.
Quick Answers
Can I use eyeshadow instead of mica powder? Pressed eyeshadow grips raw polymer well enough, but the binders mute the colour shift and pale shades vanish against black. Test one bead and bake it before committing the batch.
Can I bake the beads already threaded on the head pins? Steel findings are oven-safe, so yes, but the pin head presses a dimple into the softened bead end at temperature. Bake loose if you want clean tapers.
The holes closed up and the pin will not pass through. Baked polymer drills cleanly. Run a 1.5 mm bit in a pin vice through the original channel by hand, dust the reopened end, then re-seal it.
Does this transfer to air-dry clay? The shaping does, the finish does not. Mica needs the tack of raw polymer to grip, so on air-dry you brush it into a wet varnish coat instead, and you must pierce before drying because a dry bead chips at the exit.