Blue Statement Clay Earrings With Stenciled Polymer Clay – Using Mica Powder
Deep blue slabs with a pale pattern sitting on top of the surface, laid down through a stencil rather than cut into the clay. That is what separates these from plain cutouts. The pattern goes on while the clay is still soft, so the design sinks in slightly and stays put through baking. Florals suit the technique. Large shapes carry it better than small ones, which is why these read as statement pieces.
Blue Statement Clay Earrings
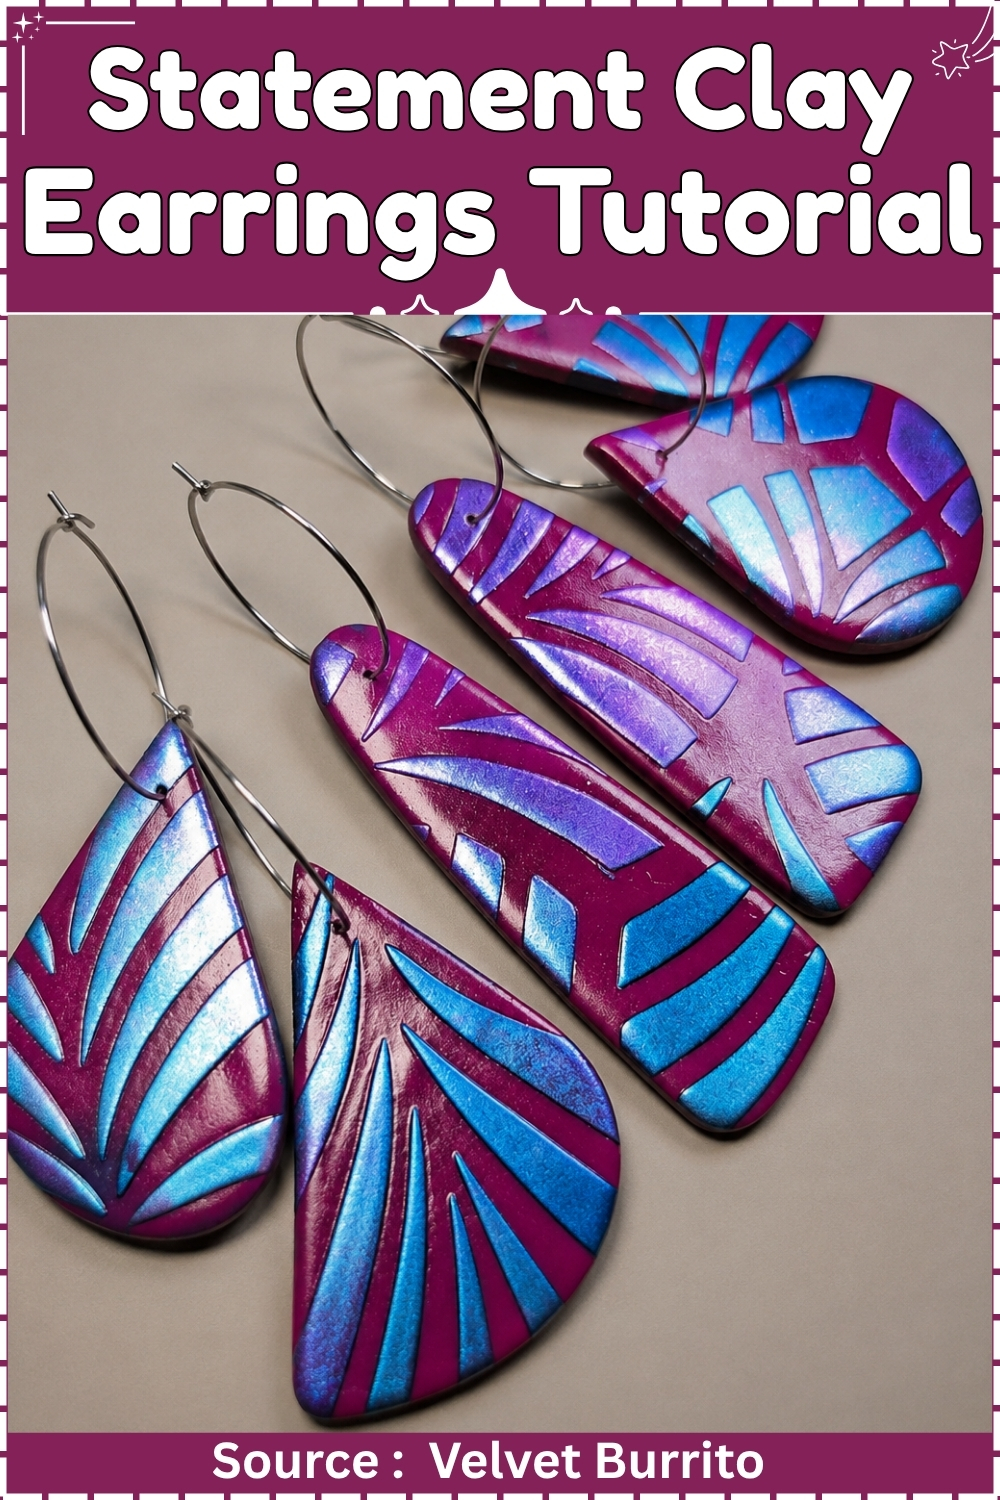
Most surface treatments on polymer clay sit on top of the clay. Mica does something different: it goes into the clay, sinks a fraction of a millimetre below the surface when you roll it, and then throws colour back at a different angle than the clay underneath it. That is why a blue leaf pattern on a fuchsia slab does not read as blue paint on pink. It reads as two colours occupying the same space and arguing about which one you are looking at. The effect only works at scale, which is why this is a statement earring at 45 millimetres and not a stud.
Why This Design Earns the Effort
A stencil and a pot of powder cost less than a set of cutters and take ten minutes to learn. The difficulty here is not technique, it is restraint. Mica wants to go everywhere, and the moment it does, the fuchsia stops being a background and becomes a muddy purple field with some shiny bits in it. The whole design depends on hard boundaries between the stenciled motif and the bare clay around it. Get that separation and a 45 millimetre teardrop carries a pattern that changes as the wearer turns her head. Lose it and you have a nice pink earring.
At a Glance
- Clay type: Polymer, oven-cured
- Brand: Sculpey Soufflé
- Base colour: Fuchsia, mixed from Cherry Pie and Igloo
- Surface: Blue, teal, violet and green mica powders through a leaf stencil
- Sheet thickness: 3 millimetres
- Key tools: Pasta machine, texture paper, leaf stencil, soft round brush, teardrop and crescent cutters, needle tool
- Cure: 130 degrees Celsius for 30 minutes
- Cool: 15 minutes on the tile
- Finished size: Teardrop 45 by 22 millimetres, crescent 28 by 10 millimetres, total drop 85 millimetres
- Weight: 3 grams per earring
- Hands-on time: 1 hour 30 minutes
- Sealer cure: 24 hours
- Total time: 27 hours
- Difficulty: Intermediate
Materials and Tools
Essential
- Sculpey Soufflé in Cherry Pie
- Sculpey Soufflé in Igloo
- Pearl Ex mica powders in Interference Blue, Duo Blue-Green, Turquoise and Emerald
- Leaf or feather pattern stencil, mylar, 100 by 150 millimetres
- Textured paper sheet
- Pasta machine
- Acrylic roller
- Tissue blade
- Teardrop cutter, 45 by 22 millimetres
- Crescent cutter, 28 by 10 millimetres
- Soft round brush, size 4
- Needle tool, 1.5 millimetre shaft
- Ceramic tile, 20 by 20 centimetres
- Parchment paper
- Aluminium foil
- Oven thermometer
- Wet-dry sandpaper in 400, 600 and 800 grit
- Sculpey Satin Glaze
- Jump rings, 5 millimetre, 20 gauge, gold-plated
- Round hoops, 15 millimetre, gold-plated
- Earring posts with loop, surgical steel
- Two pairs of chain-nose pliers
- Baby wipes
Nice to have
- Second ceramic tile
- Small silicone-tipped shaper
- Soft makeup brush for lifting loose powder
- Dust mask
- Card stock for cutter placement templates
Colour Recipes
- Ratios are by volume, adjusted by eye against the powder you plan to use over it.
- Fuchsia base: 6 parts Cherry Pie to 1 part Igloo. The white knocks the red back far enough that blue mica reads as blue rather than as purple.
- Mica gradient: work Interference Blue at the top of each motif, Duo Blue-Green through the middle, then Turquoise and Emerald at the base. Load the brush with one powder at a time and let the overlaps blend on the clay.
The Pattern
Conditioning and Sheeting
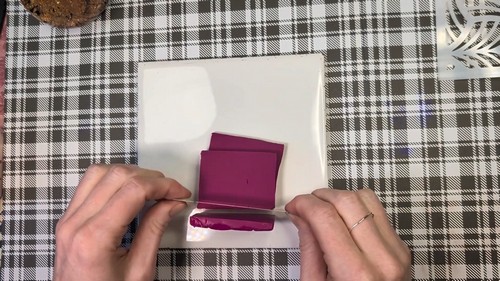
- Cut a 60 millimetre block of Cherry Pie and a 10 millimetre block of Igloo.
- Condition each colour separately until it stretches without cracking at the edge.
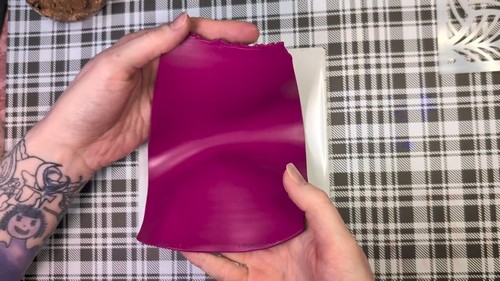
- Combine them and knead until no streaks show when you pull the clay flat.
- Sheet the mixed fuchsia through the pasta machine at 3 millimetres.
- Cut the sheet to a rectangle 100 by 150 millimetres with the tissue blade.
- Lay the rectangle flat on the ceramic tile.
Adding the Texture
- Lay the textured paper face down onto the clay sheet.
- Roll across the paper once with the acrylic roller, using light and even pressure.
- Lift the paper straight up from one corner without dragging it sideways.
- Check that the texture reads as a fine grain rather than a deep pattern.
- Rest the sheet flat on the tile for 20 minutes.
Stenciling the Mica
- Wipe your hands and the tile clean with a baby wipe, then dry both.
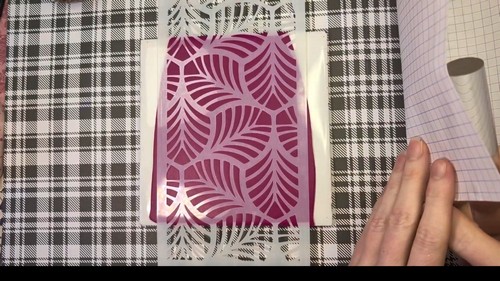
- Lay the stencil onto the clay sheet and press it down along every edge.
- Press the stencil down again across the middle so no section lifts away from the clay.
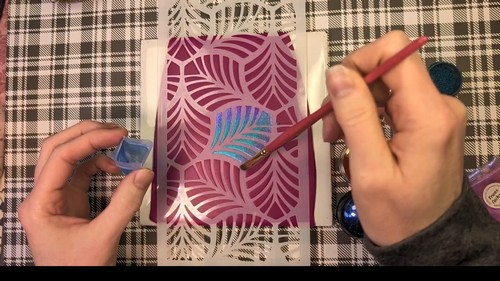
- Load the brush with Interference Blue and tap the excess off onto scrap paper.
- Colour the top third of the stenciled openings with small circular strokes.
- Switch to Duo Blue-Green and colour the middle third, overlapping the blue by a few millimetres.
- Switch to Turquoise and then Emerald for the lower third, overlapping again.
- Go over the whole stencil once more with a nearly dry brush to fill any thin patches.
- Lift the stencil straight up from one corner in a single movement.
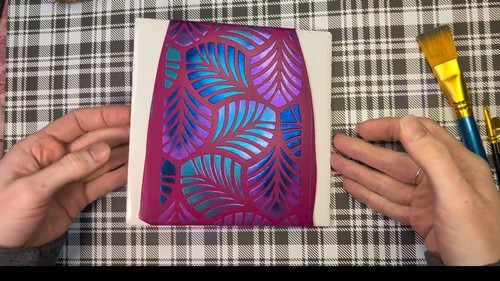
- Lift loose powder off the bare clay between motifs with a clean dry makeup brush.
Cutting the Shapes
- Trim the four outer edges of the sheet square with the tissue blade.
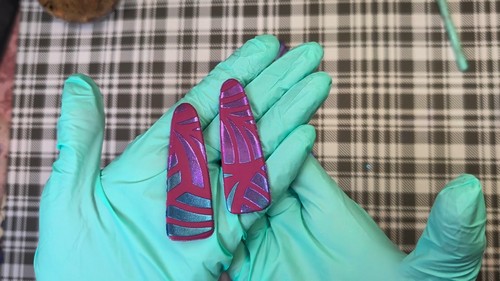
- Position the teardrop cutter over the strongest section of pattern and press straight down.
- Press the second teardrop into a mirrored position on the sheet so the motif runs the opposite way.
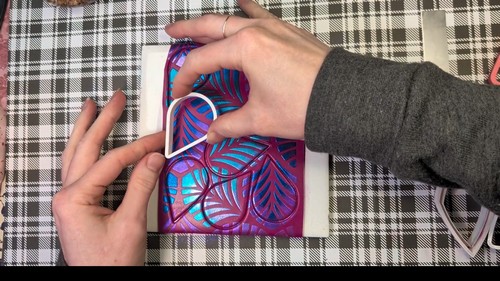
- Cut two crescents the same way, matching them as a mirrored pair.
- Peel the waste web away from around the cutouts, pulling at a low angle across the tile.
- Slide the tissue blade flat underneath each piece to lift it, never lifting by the edge.
Piercing and Refining
- Smooth each cut edge with a fingertip, working around the shape in one direction.
- Pierce a hole 4 millimetres below the narrow tip of each teardrop with the needle tool.
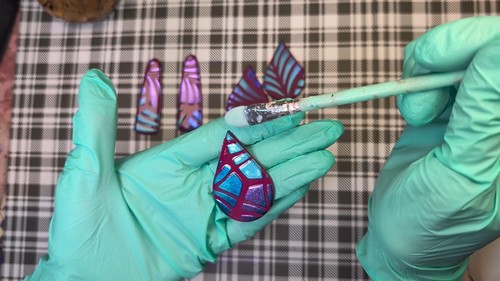
- Pierce a hole 3 millimetres in from each end of both crescents.
- Widen every hole to 1.5 millimetres by rotating the needle in place from both faces.
- Check each hole against a jump ring for fit, since a hole opened after curing tears the edge out.
- Lay parchment paper on the tile and slide all four pieces onto it, spaced 15 millimetres apart.

Curing
Bake at 130 degrees Celsius for 30 minutes. A 3 millimetre sheet gets the full 30 minutes, not a shortened version scaled to how thin the piece is, because the time belongs to the brand rather than to the thickness. Tent the tile loosely with aluminium foil and keep the foil at least 20 millimetres clear of the clay. Set an oven thermometer inside the oven and adjust the dial by that reading, because domestic ovens drift 15 to 25 degrees from their panel and Soufflé baked cool comes out chalky. Leave the tile in the oven with the door cracked for 15 minutes, then handle.
Finishing
- Wet sand the cut edges only. Work 400, then 600, then 800 grit in a bowl of water with a drop of dish soap in it, moving the paper against the edge rather than the piece against the paper. Stop the moment the edge feels smooth under a fingernail.
- Never sand the face. The mica lives in the top fraction of a millimetre and 800 grit removes it in one pass.
- Sealing is not optional here. Loose mica sits proud of the clay and transfers onto skin and clothing within a few wears. Brush two thin coats of Sculpey Satin Glaze over the patterned face and the edges, letting the first dry two hours before the second. Leave 24 hours before wearing.
Assembly
- Open every jump ring by twisting one end toward you and the other away, never by pulling the ends apart, which leaves a gap you cannot close cleanly.
- Link the top hole of the crescent to the hoop. Link the bottom hole of the crescent to the teardrop tip. Link the hoop to the post loop. Close each ring until the two ends meet under pressure.
- Check the mirrored pair before the final ring goes on. Hold both earrings up together and confirm the motifs run away from each other rather than in the same direction.
- At 3 grams per earring these hang without dragging on the lobe. Surgical steel posts are the right call against a piercing, with the gold-plated hoops kept below the ear where they touch nothing.
Where Makers Go Wrong
- Loose powder travels after you think you are finished. Mica that was never pressed into the clay drifts across the sheet on static and settles into the texture grain between the motifs, dulling the fuchsia into a hazy lilac that only shows up once the piece is baked and the light hits it flat. Lift the residue with a dry brush before you cut, and change your work surface between the powder stage and the cutting stage.
- The cutter drags mica down the cut wall. Pressing a cutter through a powdered surface pulls a metallic smear onto the fresh edge, and sanding that smear away also removes the pattern for a millimetre inward from the rim. Cut with a single decisive press and accept a faint edge line rather than chasing it with sandpaper.
- Gloss kills interference mica. Interference powders shift colour because light bounces off the particles at varying angles, and a high-shine film over the top forces every angle to behave the same way, so the effect flattens into plain shimmer. That is a one-way change, which is why this build calls for satin.
- Soufflé stays slightly flexible after curing. A 45 millimetre piece bends a little every time it is put on or taken off, and a brittle sealer film cracks along that flex line months before the clay itself shows any damage. Two thin coats flex with the clay. One thick coat does not.
- Stencils have a direction and pairs do not. Cutting both teardrops from the same orientation gives you two earrings whose motifs lean the same way, which looks correct on the bench and wrong in a mirror. The judgement of where to place the second cutter is yours, and it has to happen before the blade goes anywhere near the sheet.
Variations
- Bare-clay negative. Reverse the stencil relationship by brushing mica across the whole sheet first and laying the stencil down afterwards, then wiping the exposed openings back to bare fuchsia with a damp cotton bud. The motif becomes matte clay inside a metallic field.
- Two-tone slab. Sheet Cherry Pie and Bluestone side by side, butt the edges, and roll them together into one sheet before texturing. Position the stencil across the seam so the same motif reads warm on one side and cool on the other.
- Layered depth. Cut the crescent from an unstenciled fuchsia sheet at 2 millimetres and cure it separately, then it sits as a plain matte counterweight above the busy teardrop instead of competing with it.
Care
The sealed face is the vulnerable surface, and a fingernail catch is what starts a lifting edge. Do not stack these against other jewellery, since the satin film scratches long before the clay marks. Perfume and hairspray dissolve the sealer and take the mica with it. The pierced tip of the teardrop is the thinnest point on the piece and cracks from ring flex, not from impact. Hang them by the post rather than laying them face down, so nothing rests on the pattern.
Quick Answers
- Can I use eyeshadow instead of mica powder? Yes, for the shimmer, but not for the colour shift. Pressed eyeshadow has filler in it that goes chalky under sealer, so scrape it loose and use it sparingly.
- My mica went dull the moment I sealed it. You used a gloss, or you applied the coat too thick. Sand the sealer back with 800 grit wet, which removes the film without reaching the clay, and recoat thinly with satin.
- Does this method work on air-dry clay? Partly. Mica sits on the surface rather than sinking in, so the pattern is fainter and the sealing step becomes structural rather than cosmetic.
- Can I skip the texture paper? You can, and the stencil will actually read crisper. The texture is there to stop the bare fuchsia looking like plastic, so lose it only if the whole face carries pattern.
Alt Text Suggestions
- A fuchsia polymer clay sheet rolled flat on a white ceramic tile.
- Textured paper being lifted away from a rolled sheet of pink polymer clay.
- A leaf pattern stencil pressed onto a fuchsia polymer clay slab.
- Blue and teal mica powder being brushed through a stencil onto pink clay.
- A stencil peeled back to reveal a shimmering blue leaf pattern on fuchsia clay.
- Teardrop and crescent cutters pressed into a stenciled polymer clay sheet.
- Excess clay peeled away from cut earring shapes on a tile.
- Finished blue and fuchsia stenciled statement earrings hanging from gold hoops.