Realistic Floral Clay Earrings Idea – Soft Pink Petals With Crystal Centers
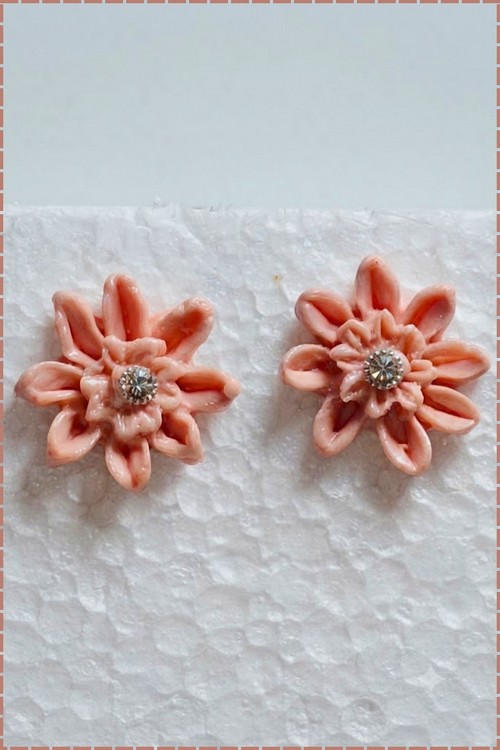
Soft pink petals with a small crystal set at the centre of each flower, thin enough at the edges to catch a curl. Realistic petals need shaping rather than cutting. You thin the edge with a ball tool, cup it slightly, then build the flower up petal by petal so it sits with some depth instead of lying flat. The crystal goes in last while the clay is still soft. Delicate work, slower than most clay earrings, and worth it for weddings.
Floral Clay Earrings Idea
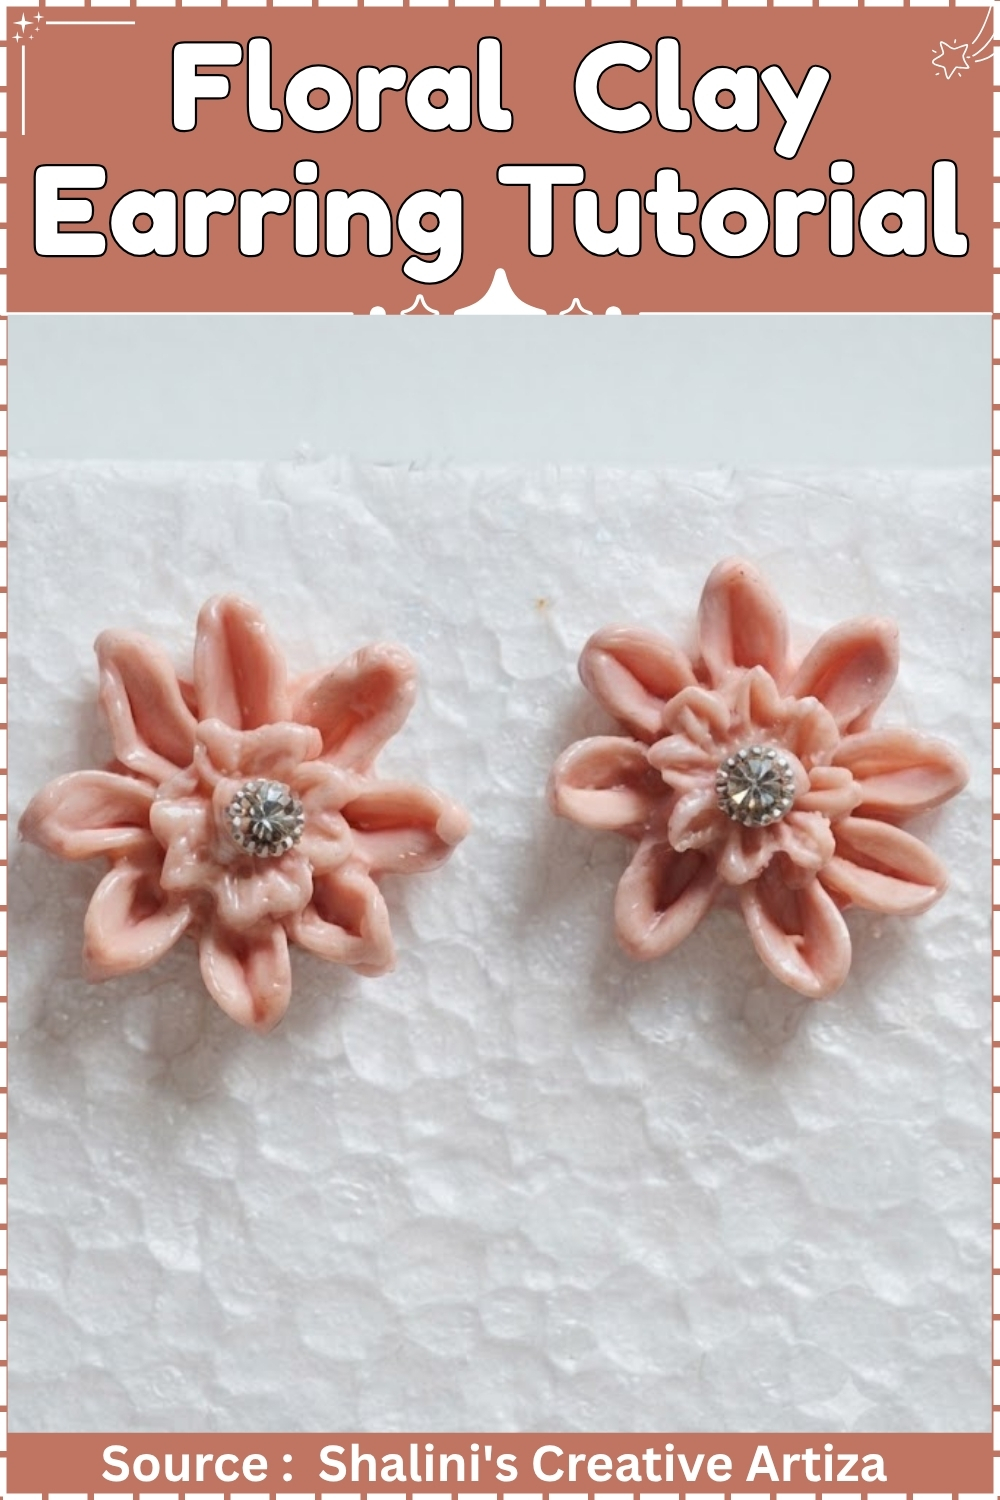
Molded flowers get a bad name because most of them come out looking like flat pink blobs with petal lines pressed into them. The fix is not a better mold. It is pressure, and where you put it. Packed properly, a silicone floral mold holds undercuts fine enough to read as real petal edges from arm’s length, which is the only distance an earring is ever judged from. These sit at 13 mm, light peachy pink, with a crystal set into the throat of each flower. Light on the lobe, flat against the ear, and quick enough that a pair takes an evening including cure.
At a Glance
- Clay type and brand: Polymer clay, Sculpey Premo
- Colour: Light peachy pink, mixed from white, translucent, and a touch of pink
- Tools: Detailed floral silicone mold, small sculpting spatula, tissue blade, cornstarch, tile or cardstock, oven thermometer
- Cure method: 275°F / 130°C for 30 minutes per 1/4 inch (6 mm) of thickness, minimum 30 minutes
- Finished size: 13 mm across, 5 mm deep at the center
- Hands-on time: 45 minutes
- Total time: 2 hours including cure, cool, and glue set
- Difficulty: Easy
Materials and Tools
Essential
- Sculpey Premo in White, Translucent, and Blush or Fuchsia
- Detailed floral silicone mold, cavity 12 to 14 mm
- Flat-pad stud posts, surgical steel or nickel-free, 8 mm pad
- Butterfly backs to match
- Two flat-back rhinestones, 3 mm, SS12
- Two 8 mm round filigree or textured metal backing discs, gold
- Small metal sculpting spatula or clay shaper
- Cornstarch and a soft dry brush
- Ceramic tile or plain cardstock for the bake tray
- Aluminium foil for tenting
- Standalone oven thermometer
- Two-part epoxy adhesive, five-minute set
Nice to have
- Pasta machine for conditioning
- Wet/dry sandpaper in 400, 600, and 1000 grit
- Denim scrap for buffing
- Ball stylus, 1 mm, for seating the crystal
- Gloves or a lint roller to keep pale clay clean
Colour Recipes
Pale pink shows every speck of dust and every smear of a darker colour, so mix it first, before any other clay touches your hands. Start at 8 parts White to 2 parts Translucent to 1/8 part Blush. The translucent is what keeps the petals from reading as flat plastic under light, and it does the most work in the thin outer edges of a molded flower. Adjust the pink by eye in slivers rather than pinches. Warm it toward peach with a rice-grain amount of yellow if you want it closer to a real petal.
Styling and Wear
These are lobe-huggers, not danglers, and that changes what they pair with. A 13 mm molded flower sits flush and reads as texture rather than shape, so it holds up next to a busy collar or a scarf where a dangle would tangle. Pale pink against a warm gold backing disc is the safest combination for most skin tones. Under 3 grams a side, they stay put through a full day without the pad tipping forward. Wear them with hair up. The whole point of the mold detail is that someone standing beside you can see it.
Build

Flower One
- Condition the pink mix until it stretches without tearing, roughly one minute of folding and rolling.
- Dust the mold cavity with cornstarch and tap the excess out.

- Roll a ball of clay 1.5 times the volume of the cavity.
- Press the ball into the center of the cavity first, then work outward toward the petal tips with your thumb.
- Press again along each petal tip with the flat of the spatula until clay reaches every point of the cavity.
- Trim the excess flush with the mold face using the tissue blade held flat against the silicone.
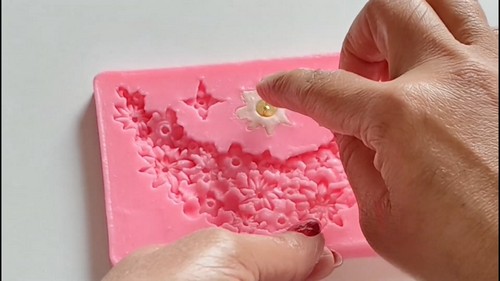
- Clean the outer edge with the spatula tip so the back sits level.
- Press the pad of a stud post into the center of the clay back until the pad is flush with the surface.
- Roll a 4 mm ball of clay, flatten it to 1 mm, and press it over the post pad to lock it.
- Flex the mold from one edge and peel it back gradually. Do not pull the piece out by the post.

- Set the flower face up on the tile.
Flower Two
- Repeat steps 2 through 7 with a second ball of the same mix.
- Press the 8 mm gold backing disc onto the clay back, centered, until it beds in 1 mm.

- Press a stud post pad through the center of the disc and into the clay beneath it.
- Cover the pad with a flattened 4 mm disc of clay as before.
- Flex and peel the mold from the edge to release.
- Set the second flower beside the first, face up.
Matching the Pair
- Compare the two face up under a single light source, rotating each so the petals align the same way.
- Correct any flattened petal tip with the spatula tip before cure.
- Check both posts stand square to the back by resting each piece face down on the tile.

Curing
Preheat to 275°F / 130°C and confirm the temperature with a standalone oven thermometer sitting on the rack. Domestic ovens run 25 degrees out in either direction routinely, and that gap is the difference between finished and brittle. Bake the earrings face up on a ceramic tile or plain cardstock, never bare metal. Tent loosely with foil to block the direct element and to keep pale pink from scorching brown at the petal tips.
Bake 30 minutes. These pieces are 5 mm at their thickest, so a single 30-minute run at the Premo minimum covers them. Cool completely on the tile before touching. Polymer reaches full strength only once cold.
Finishing
Molded pieces need less sanding than cut ones because the silicone leaves a finished surface, so restrict yourself to the back and the outer rim. Wet sand those with 400 grit, then 600, then 1000, keeping the paper and the piece wet throughout to stop the clay dust from clogging and scratching. Buff the rim with a denim scrap until it gains a low sheen. Leave the petal faces alone entirely. Sanding a molded detail is how you erase the detail you just spent the build capturing. Skip sealing. Cured Premo needs none, and a glaze pooled in the petal recesses will read as wet plastic.
Hardware and Assembly
Mix a small amount of two-part epoxy on scrap card. Pick up each rhinestone on the tip of a ball stylus dampened with the smallest amount of epoxy, then seat it into the flower throat and press straight down. Wipe any squeeze-out immediately with a cotton bud, because cured epoxy on a matte petal face cannot be removed without sanding. Let the epoxy set 24 hours before wear, not the five minutes on the packet, which is handling time only. Use surgical steel or nickel-free posts throughout. Fit butterfly backs sized to the post, not oversized ones, since a loose back lets the flower tip forward on the lobe.
Where Makers Go Wrong
- Underfilling the cavity. Too little clay in the mold means the petal tips fill last and fill worst. The piece looks complete because the outline is there, but the tips come out rounded rather than sharp, and you only see it once the piece is cured and the light hits it.
- Setting the post before the clay is packed. A post pressed in while the underside is still soft and under-supported pushes clay back into the cavity from behind, lifting the face of the flower off the mold floor. The front detail flattens invisibly, and there is no correcting it after unmolding.
- Skipping the release dust because the mold “never sticks.” Silicone molds get stickier as they age and pick up plasticizer. The first piece that tears on release usually tears at a petal tip, which is the one part of the piece you cannot rebuild by hand to match.
- Working pale clay after coloured clay. Pink this light picks up pigment from your fingers hours after you last touched red or black, and it does not show until the piece is cured and the mark has darkened.
Variations
| Variation | What changes | Notes |
|---|---|---|
| Translucent petal edges | Raise translucent to 5 parts against 5 white | Petal tips glow at the rim, best in a mold with thin outer petals |
| Pearl center | Swap the rhinestone for a 3 mm half pearl | Warmer and quieter, pairs better with the gold backing disc |
| Two-tone press | Press a 1 mm sliver of deeper pink into the cavity center before the main ball | Colour concentrates in the flower throat the way it does on a real petal |
Care
Take them off before sleeping, since a flat pad under pressure all night bends the post. Store the pair face up rather than loose in a dish, because the crystal edge scratches the petal face of its partner. Keep them away from perfume and hairspray, both of which fog the rhinestone and dull the buffed rim. Refit the butterfly backs if they slide freely, as a tipping stud drags on the piercing. If a petal tip dulls with wear, buff it lightly with denim rather than sanding it.
Quick Answers
- Can I use air-dry clay in the same mold? Yes, but not the same way. Air-dry shrinks as it dries, so the flower comes out slightly smaller and the post has to be seated before drying rather than after. It also needs sealing, which polymer does not.
- The clay is stuck in the mold. Now what? Put the whole mold in the freezer for 10 minutes. The clay firms and releases cleanly. Do not pry at the edges with a blade, which cuts the silicone and ruins the mold for every future piece.
- Can I glue the rhinestone with superglue instead of epoxy? It will hold for a while and then let go, usually in a pocket or a bag. Cyanoacrylate goes brittle against polymer and also fogs the crystal facets as it cures. Use epoxy.
- Do I have to buy a stud post, or can I bake a loop into the back? A wire loop set into 5 mm of clay pulls out eventually because there is nothing for it to grip. If you want a dangle version, bake the flower flat and glue a flat-pad bail to the back instead.